

Industry Trends
Flag Incoming Quality Inspection Checklist: What to Check During Inspection (8-Step Practical Process)
Sep
Why Flag Acceptance Needs a Fixed Checklist
Flags are a product where the truth only shows up once they arrive. When you place an order, all you see is the design proof and a sample swatch; when the shipment arrives, what you see first is the stitch direction, color deviation, and grommet placement. If the acceptance step only counts quantities without checking workmanship, problems often stay hidden until the goods reach your end customer, and the cost of repairs and replacements is far higher than the extra half hour spent at receiving. The checklist below covers the areas most prone to problems in flag incoming inspection. It applies to most categories, including standard national flags, advertising flags, beach flags, table flags, and feather flags, and you can add or remove items based on your own order mix.
1. Outer Packaging and Batch Verification
- Check whether the number of outer cartons and the carton mark information match the delivery note, order number, and style/model;
- Check whether the contents are packed separately by style and size, with specification labels attached;
- Check the packaging for moisture, water stains, crushing, deformation, or damage;
- Check whether the packing list, workmanship instructions, and signed sample copies are all included.
This step looks basic, but mixed packing and wrong packing are the most common arrival problems. Once you find that the styles inside a carton do not match the carton mark, pause acceptance for the whole batch and first confirm with the supplier whether the wrong goods were shipped or the labels were applied incorrectly.
2. Specifications and Dimensions: Don’t Rely on Visual Estimation
The length-to-width ratio of a flag directly determines how it looks when hung, especially in scenarios where flags are used in groups. During inspection, use a tape measure to measure the actual net flag face dimensions (excluding the pole sleeve and ties) and compare them with the dimensions agreed in the order. Measure several pieces from the same batch, focusing on whether the long and short edges are consistent and whether the diagonals are close to equal, to judge whether there is skewed cutting. For flags that need to be used in pairs or sets, place the pieces from the same group together for comparison to avoid a situation where individual pieces pass but the group looks mismatched.
3. Fabric Appearance: Look, Feel, and Hold Up to Light
- Hold the fabric up to the light and check for uneven density, thick and thin bands, or obvious skew;
- Check by hand whether the thickness matches what was agreed in the order, and whether it is noticeably too stiff or too soft;
- Inspect each piece for stains, snags, holes, pull marks, and creases or pressure marks;
- Check whether dark and light fabrics show color bleeding or staining.
4. Color and Graphics: The Signed Sample Is the Standard
The only basis for color acceptance is the signed sample or color card confirmed by both parties; you cannot judge from memory. Lay the arriving flag face flat next to the signed sample under the same light source and compare them once under daylight and once under indoor lighting. For the graphics, focus on: whether the graphic proportions and positions are shifted, whether text is mirrored or upside down, whether multicolor printing is misregistered, whether fine text and logo details are blurred at the edges, and whether the show-through effect on the back of double-sided flags matches what was agreed. Also compare pieces from the same batch against each other to confirm color consistency.
5. Stitching Workmanship: From the Edges to the Four Corners
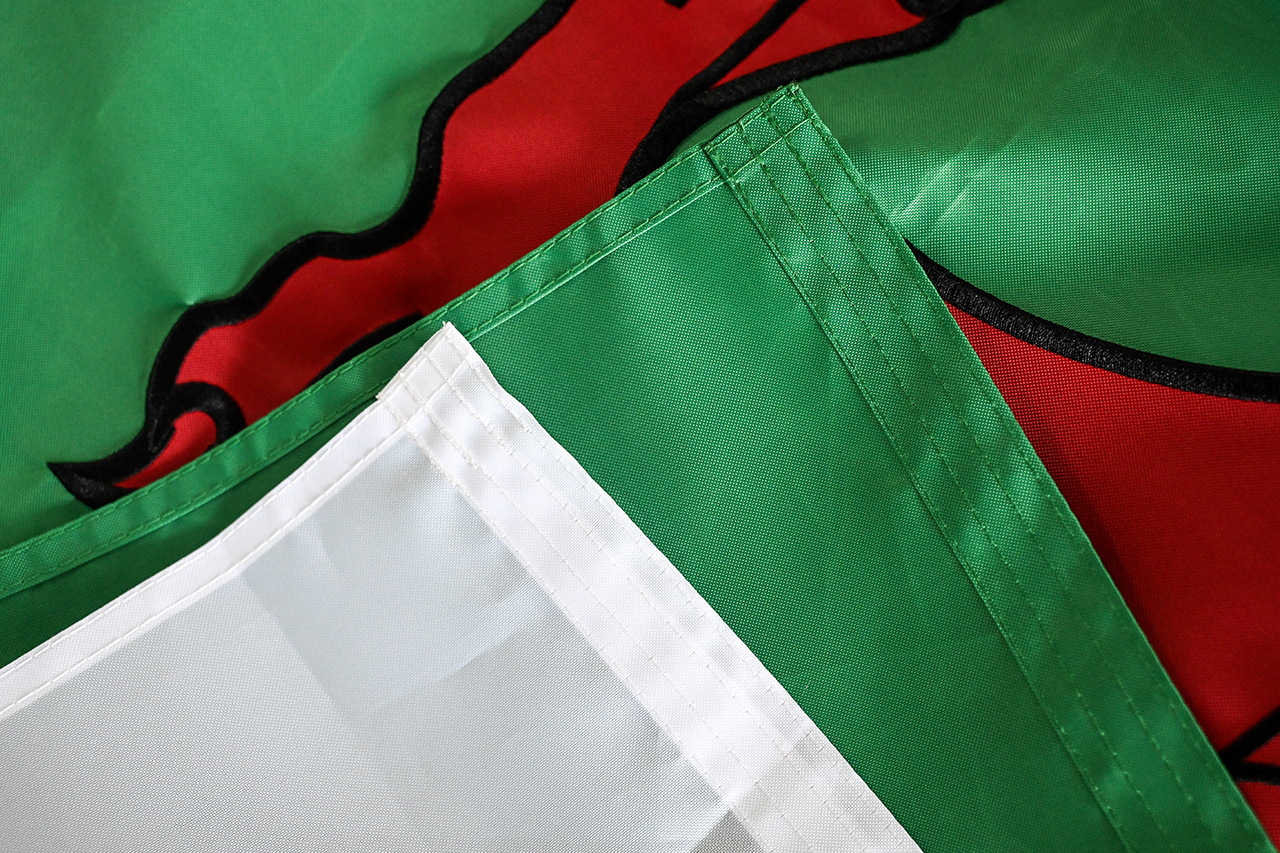
- Check whether the hem on all four sides is straight, whether the width is even, and whether there is twisting or wrinkling;
- Check whether the stitches are even and whether there are skipped stitches, broken threads, loose threads, or missed seams;
- Check whether all four corners are reinforced and whether the stress points are reliable;
- For pieced styles, check whether the pattern and stripes are matched and whether the seams are flat;
- Check whether loose threads and raw edges are cleaned up and whether the thread color matches the flag face.
6. Hardware and Finishing: Grommets, Pole Sleeves, and Ties
- Check whether grommets or metal rings are symmetrical and centered, whether the spacing is consistent, and whether the edges have burrs;
- Check whether the pole sleeve (heading) width matches the agreed pole diameter and whether both ends are securely closed;
- Check whether the position and length of ties, hook-and-loop fasteners, buckles, and ropes meet requirements, and whether the bonding or fastening is secure;
- Check whether the color and material of the hardware match the signed sample and whether there is obvious color deviation.
7. Simple On-Site Checks You Can Do Right Away
You don’t need to rely on laboratory testing; you can also do some basic screening right at receiving: lift the flag face and shake it to see whether the graphics show ghosting or misalignment; gently rub a white cotton cloth over a dark area to see whether there is obvious color transfer; fold the flag and lightly scratch along the seam with a fingernail to see whether the stitching breaks easily; and hold the flag face up to the light to see whether the light passes through evenly, which helps judge whether the fabric density is consistent. These methods are only a preliminary screen. Once you find an abnormality, pause acceptance and ask the supplier to explain or provide a replacement sample for confirmation.
8. Sampling Ratio and Record-Keeping Method
For smaller batches, a full inspection is recommended; for larger batches, inspect by sampling ratio, but the sampling must cover every carton, every colorway, and every size specification. When you find nonconforming products, record the batch number, carton number, style, problem description, and proposed handling, and take on-site photos or short videos with a ruler in frame. Keeping these records on file not only makes communication with the supplier easier, but also serves as an acceptance reference for future replenishment orders.
9. Common Problems and Handling Suggestions
- Minor loose threads and packaging creases: can be tidied on site and simply recorded;
- Obvious color deviation, out-of-tolerance dimensions, or graphic errors: return the whole batch or require rework;
- Missing grommets or misplaced grommets: negotiate replacement parts or repair; do not modify them yourself;
- Fabric damage or stains: pick these out separately and isolate them so they do not get mixed into conforming goods for shipment.
Summary
The core logic of a flag incoming quality inspection checklist is “match the sample, match the dimensions, match the workmanship, match the hardware.” Print out these four categories of check items and post them in the inspection area, check off each item at every delivery, and keep photo records. This can significantly reduce later customer complaints and rework. For custom flag orders, the safer approach is to confirm the signed sample and acceptance standards at the ordering stage and write the dimensional tolerances, color references, and stitching requirements into the order notes, so that incoming acceptance has a clear basis.
